Coaching - Range
Analyse your whole game. Tweak, compare before and after, to maximise your potential.
Improve your game with Awesome Golf Simulator's Coaching Game Mode. You can record your swing, compare before and after, and get instant feedback on each shot.
When loading in to the Coaching Range Game Mode, you'll be prompted to pick the first club that you're using - and optionally give it a description. The Coaching Game Mode will then display Waiting for first shot at the bottom of the screen.
For more information on each metric's meaning and the Launch Monitor support for our supported metrics, visit Awesome Golf Metrics - this web page gives a breakdown of the metrics, explanations, ideal values, and Launch Monitor support for each metric.
Additionally, you can review your shots and distances from the Coaching game mode using Awesome Golf Insights or the Awesome Golf Community app.
Views & Graphs
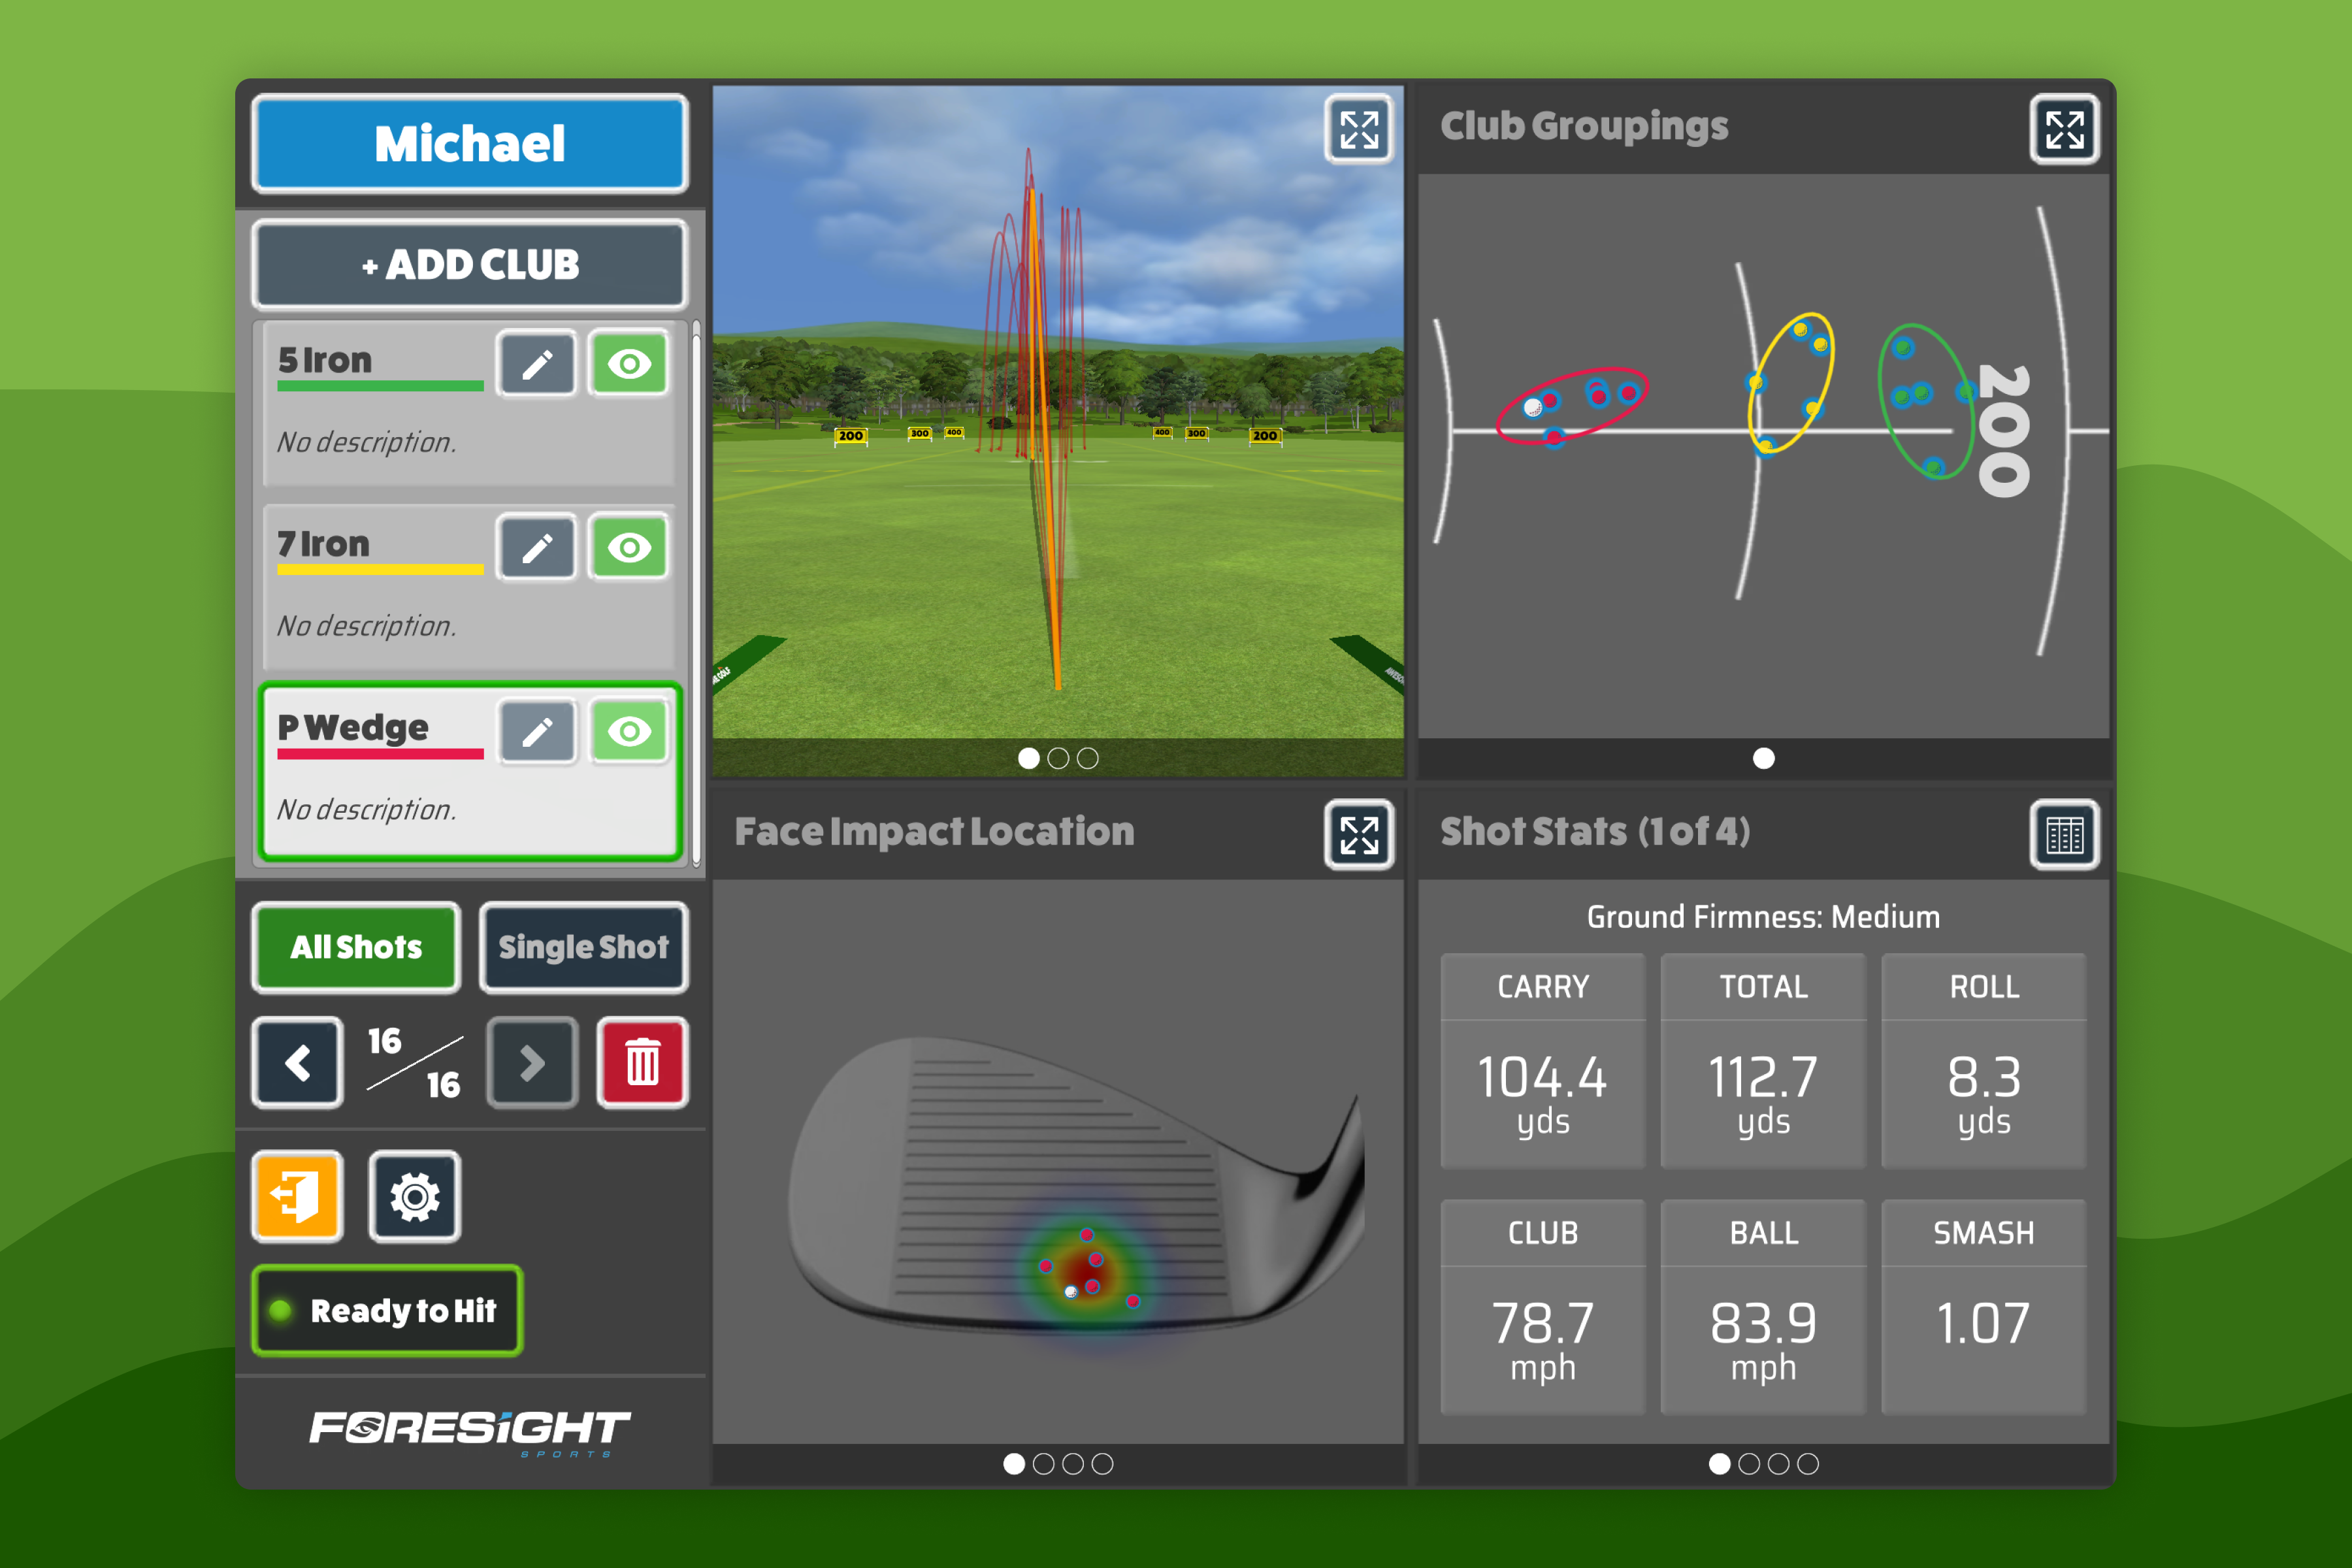
The main portion of the screen in the Coaching Game Mode shows 4 quadrants with different displays and information in each section. The expand button in the top-right of each quadrant display will allow you to fill the screen with the data shown in the quadrant, for a focused view. Some quadrants can display multiple data views - these can be switched by swiping horizontally in the quadrant, or selecting a dot in the carousel at the bottom of the quadrant.
In the top-left quadrant you can switch between viewing: the simulator driving range with all of your shot tracers, a top-down view of your ballflight as a graph, and a side-on view of your ballflight as a graph.
In the top-right quadrant you can view the club groupings. After at least 3 shots with any club a coloured circle/oval will appear around the group of club's shots.
In the bottom-left quadrant you can switch between viewing:
- Face Path Visualisation showing you your club path angle, face-to-club angle, and horizontal launch angle
- Dynamic Visualisation showing your club's angle of attack, dynamic loft at impact, and vertical launch angle.
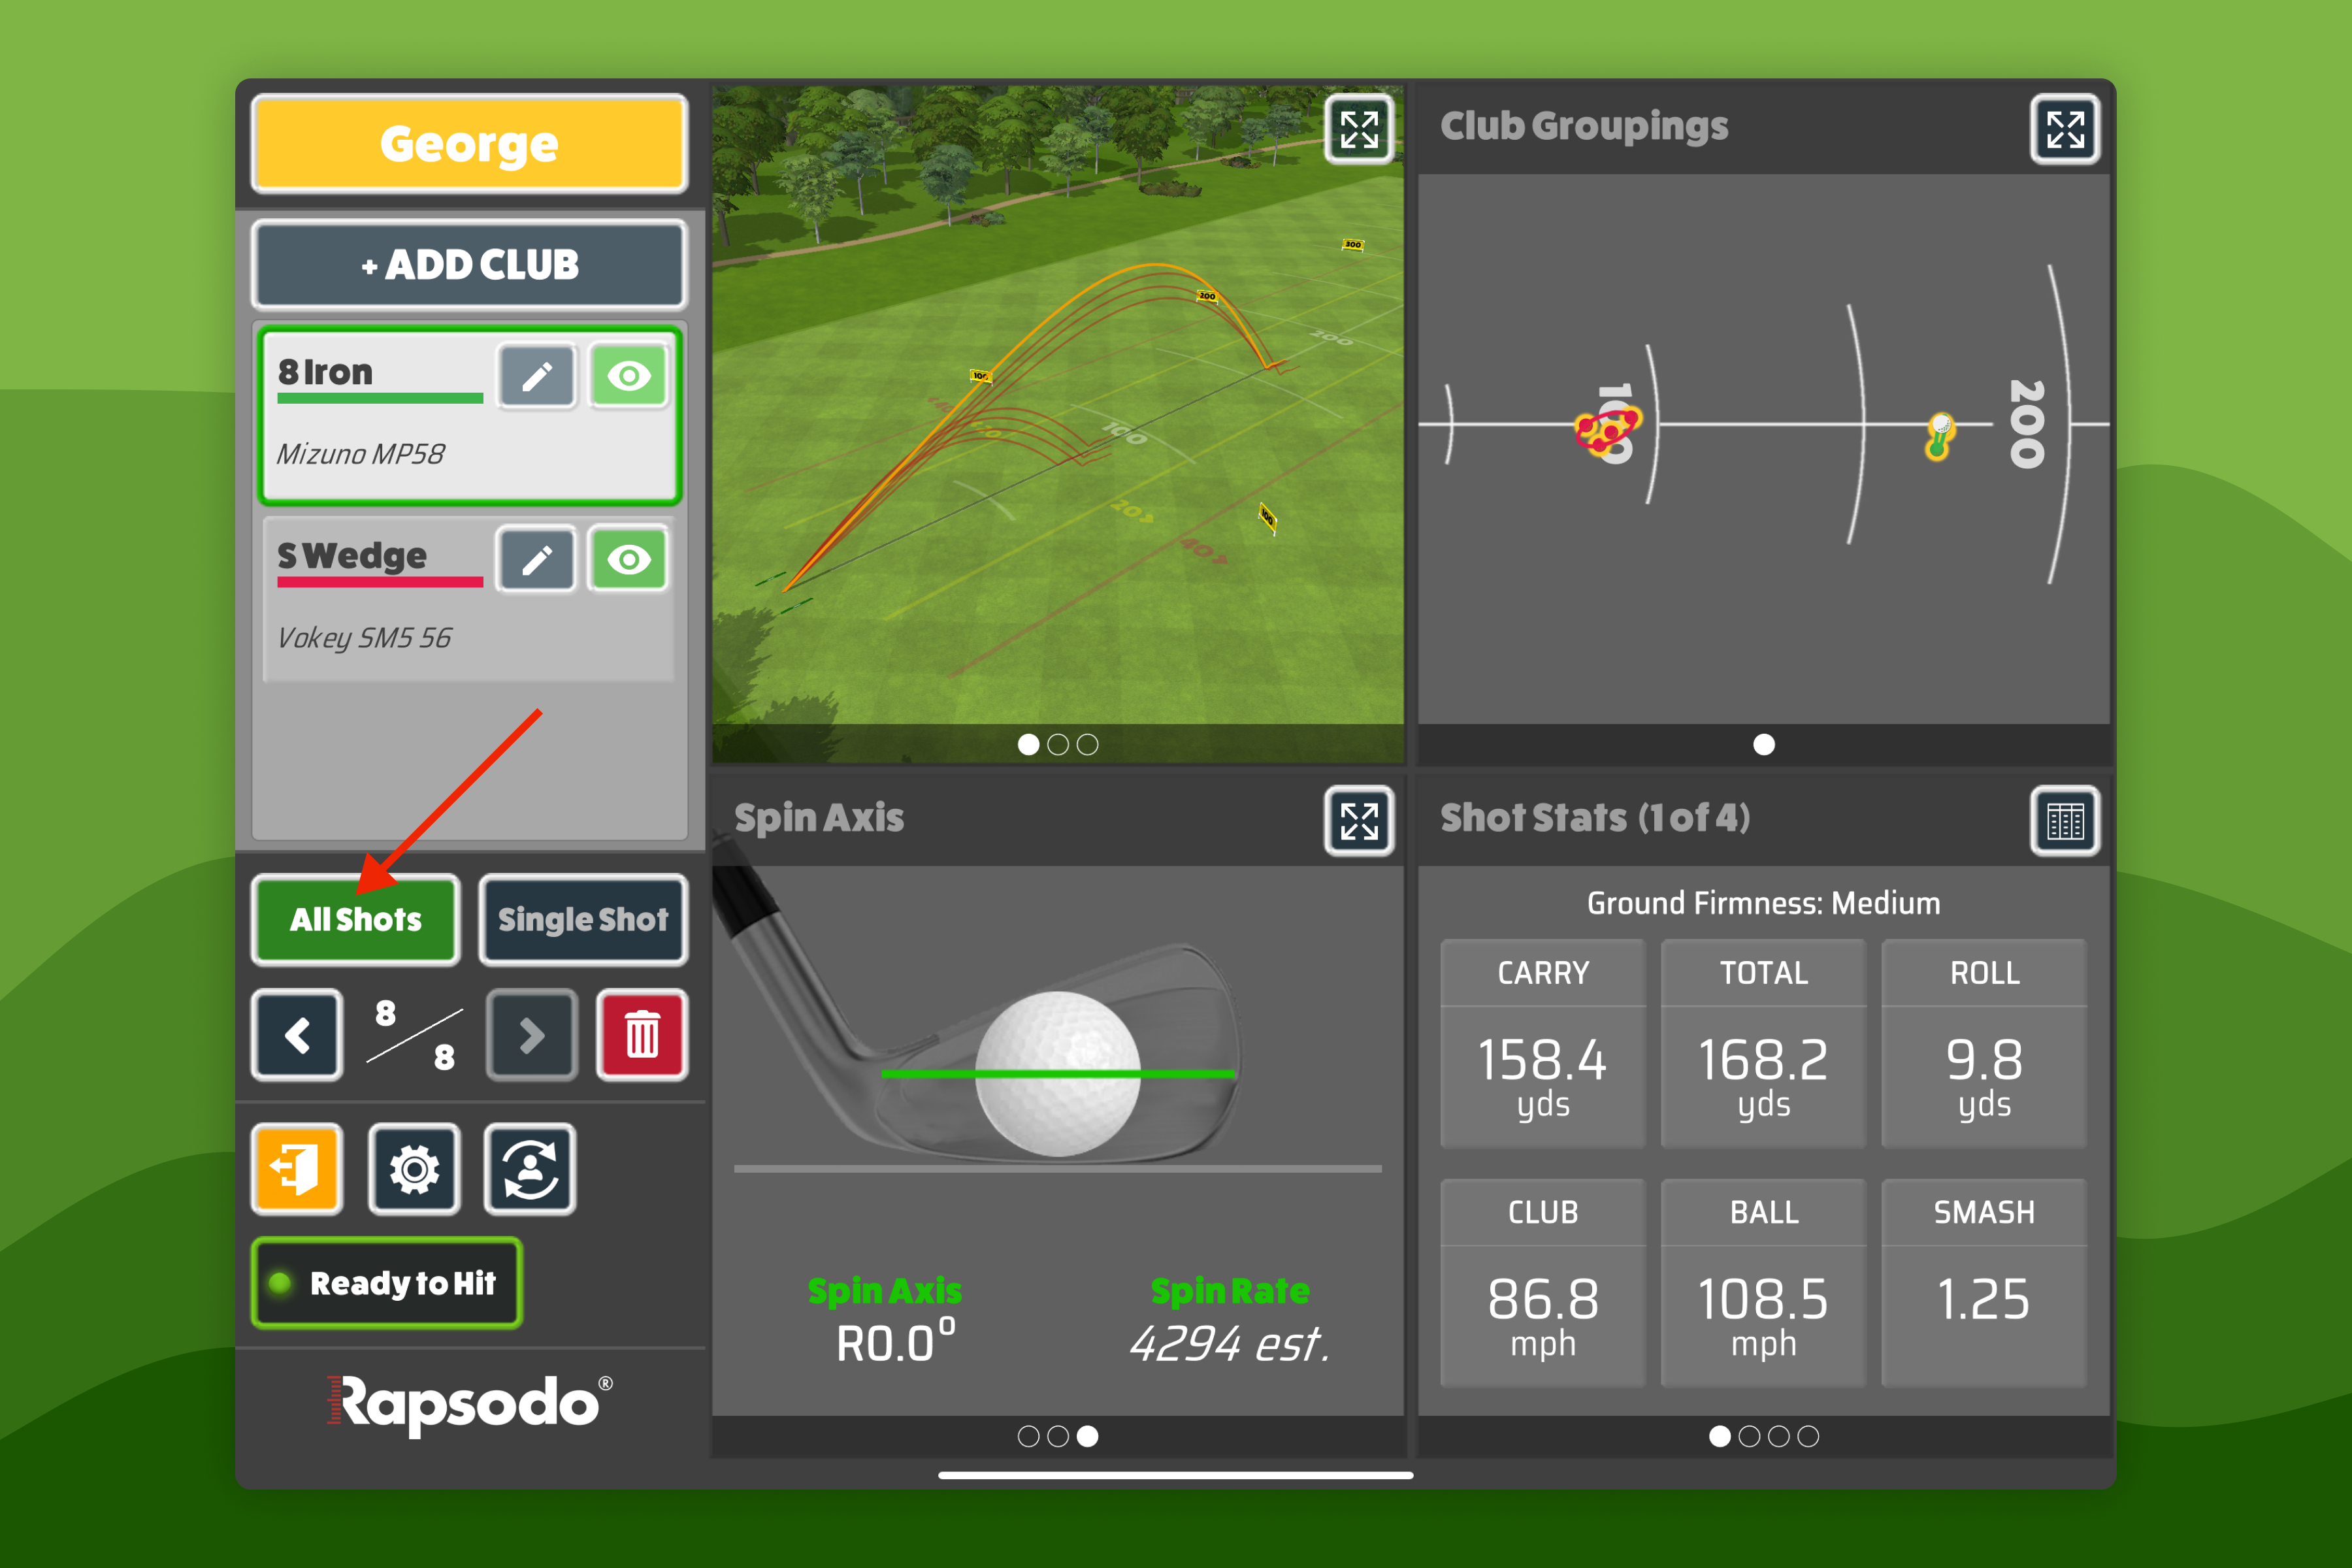
- Spin Axis Visualisation showing the shot's spin axis and backspin reading.
In the bottom-right quadrant you can switch between all of the data metrics for the shot, split between four slides. The table icon in the corner of this quadrant, in-place of an expand icon, will expand to show a table with all of the data metrics for your session, split up by the different clubs used, with additional statistics for averages and standard deviations for each data metric for each club.
Face Impact Location
Face Impact Location is an important metric to help you improve your accuracy by visualising the point where the ball made contact with the clubface. It allows you to see patterns in your swing, such as consistently hitting off the toe or heel, so you can make adjustments to achieve more centred and accurate contact.
The following Launch Monitors support tracking Face Impact Location:
- Foresight Sports GCQuad/QuadMAX
- Foresight Sports Falcon
- Foresight Sports GCHawk
- FlightScope Mevo+, with the FlightScope Pro Package Face Impact Location Add-On
- FlightScope X3/X3C, with the FlightScope Pro Package Face Impact Location Add-On
If you're using a FlightScope Mevo+ or FlightScope X3/X3C, the Launch Monitor requires the FlightScope Pro Package Face Impact Location Add-On to support tracking Face Impact Location.
FlightScope-Specific Visualisations
If you're using a FlightScope Mevo+ or FlightScope X3/X3C, you will also see the following visualisations in the bottom-left quadrant of the screen:
- D-Plane Visualisation - If you're using a FlightScope Mevo+ or FlightScope X3/X3C, you can also view a D-Plane visualisation.
- Swing Vision/Video - If you're using a FlightScope Mevo+ or FlightScope X3/X3C, you can also view a video replay of the swing. If you have purchased the FlightScope Pro Package you will need to additionally activate
Swing Visionin Awesome Golf Simulator's System Settings, from the Main Menu.
Shot Display & Selection
In the sidebar, on the left-hand side of the screen, are two options for displaying the shots:
- All Shots - this mode will show you all of the tracers from your current session and is the default view
- Single Shot - this mode allows you to view only the most recent, or actively selected, shot.
If you want to revisit another shot from your current practice session, you can use the left/right arrows in the sidebar on the left-hand side to scroll through your previous shots. You can also delete the selected shot by selecting the red trash/delete button, to the right of the left/right arrows.
Club Selection
Club selection lets us pair the shot result with the particular club used which can help when reviewing your practice session. A description can also be added to a club to hep differentiate it from another similar club in the session - this can be useful when comparing different shafts, lie angles, grips, lengths, lofts, and manufacturer.
A new club can be added at any time by selecting the Add Club button in the top-left corner. The clubs added to your session will be shown in a list on the left-hand side of the screen, with the most recently added club at the top of the list. Tapping on a specific club in the sidebar will select it - only one club can be selected at a time.
Selecting the pencil (✏️) button next to a specific club will allow you to edit club, including the club type and description, selecting Done to save your changes. The eye button also displayed next to a specific club will allow you to hide/show the shot tracers and groupings from the driving range and graphs for that specific club.
A club can also be removed from a session at any time by selecting the pencil, edit, button next to the specific club on the left-hand side of the screen then selecting Remove Club and Data - this will also remove any shots made with that specific club.
Camera Angle
Selecting the settings cog (⚙️), in the bottom-left of the screen, will allow you to change the Camera Angle for your shots' simulation:
- Behind Tee - a static camera angle from the perspective of behind the tee.
- Isometric/Side-View - a static camera angle from the side of the range, showing you a full view down-range.
- Dynamic/Following - a dynamic camera angle that follows your shots similar to a fly-over.
Ground Firmness
Selecting the settings cog (⚙️), in the bottom-left of the screen, will allow you change the simulated ground firmness for your shots in Shot by Shot. Ground firmness can affect the roll distance of your shots and can be good practice to adjust this to match the current climate or weather of your local environment.
Our ground firmness scale ranges from 1 to 5, with 1 being the softest and 5 being the hardest. The softer the ground, the shorter the roll distance on your shot.
Change Player
When playing with multiple players a button to switch the active player will be displayed in the bottom left of the screen, to the right of the Exit button. Changing player will change who the shots are tracked for, allowing each player to track and review their own shots individually. Registered players can also allow each player to review their stats and performance later using Awesome Golf Insights, online, or the Awesome Golf Community app.
To add a new player, once already playing Shot by Shot, you'll need to return to the Main Menu, and press Add Player at the bottom of the screen. For more information on adding players and guests, see our Adding Players Guide.
Launch Monitor
The connection status for your Launch Monitor, along with the logo of the Launch Monitor's brand, will be displayed in the bottom left corner of the screen.